Cockpit Drill: D S S S M.
- Doors: Check that doors are properly closed.
- Seat/ Head Restraint: Adjust driving seat to see all around and reach all the controls comfortably. Adjust head restraint if necessary.
- Steering: Can you reach comfortably? Not stretching, not cramped. Is the steering height correct?
- Seatbelt: Ensure that you and all passengers are belted up. See Highway Code for regulations.
- Mirrors: Adjust all mirrors for best possible view, without moving your head, not forgetting the door mirrors. Try to learn MSM: Mirror, Signal, Manouevre.
Complete the cockpit drill BEFORE moving off.
Foot Controls: A B C
- Accelerator (Gas
Pedal): The pedal on the right. Use only with your right foot. This
pedal controls the rate at which fuel and air are supplied to the
engine. The harder the pedal is pressed, the faster the engine will run
and more power is generated. Press the pedal lightly, using gentle
changes in pressure in normal driving. Easing off the pedal will
normally make the car slow down.
- Brake: The middle
pedal. Use normally with your right foot. The more pressure you apply,
the more the car will sloe down. Using the ball of your foot, press the
pedal lightly and progressively. The rear stop lights will light up when you press the brake pedal.
- Clutch: The left
pedal. Use your left foot to operate the clutch pedal. The clutch is
needed when changing gear, just before stopping and manouevring the car
at low speeds. Learn and understand the BITING POINT.
Hand Controls.
Handbrake: Usually
operates only the rear wheels of the car via a cable and secures the
car after it has been stopped. Remember always to use the button and to
avoid using the handbrake when the car is moving.
Gears:
Allows the car to be driven with minimum strain on the engine, the same
principal as the gears on a push bike. (Where you are the engine!) It
takes practise to make smooth and unhurried gear changes.
Changing gear depends on the engine size and the load it has to move, as well as the road and traffic conditions. Learn to listen to the tone of the engine.
Steering Wheel:
Used to control the direction of the car by turning the front wheels.
Hold lightly but firmly in the "ten to two" or "quarter to three"
position. NEVER remove both hands, do not let the wheel spin back and avoid crossing your hands or steering when the car is stationary.
Indicators: Apply M S M routine and operate without removing hands from the wheel.
Starting:
Check handbrake is on and gear is in neutral.
Turn key to release steering lock.
Turn key further to illuminate warning lights.
Turn key further to operate starter.
As soon
as the car engine starts, let go of the key. The warning lights should
go out, investigate if they don't. To stop the engine, turn key anti-
clockwise and remove it.
Moving Off and Stopping.
Mirrors, Vision and Use.
Correct and frequent use of the mirrors is essential for safe driving.
The mirrors let you know what is happening behind and beside you, which is as important as what is happening in front of you.
Use the mirrors frequently and act safely and sensibly on what you see.
Use of mirrors is essential when moving off and stopping.
Blind Spots
These
are areas that the mirrors do not cover. You will sometimes need to
look around, over your shoulders, especially before moving off.
Remember: you can't judge distances accurately using mirrors.
Mirrors- Signal- Manouevre (M S M)
The M S M routine is a vital subject and your driving instructor at John Lowe Driving will coach you fully on this topic.
Use the routine before
signalling, moving off, changing direction, changing lanes, before
accelerating, slowing down, stopping and opening the car door.
Moving Off.
Use the P O M routine.
P Prepare.
O Observe.
M Move.
Prepare.
Left
foot, press clutch fully down. Select 1st gear. Set the gas-press the
accelerator until you hear a lively, even hum.(Light pressure.)
Slowly and smoothly let the clutch pedal up to BITING POINT.
Hold both feet still.
Observe.
Check mirrors, blind spots, road ahead and mirrors again. Decide if you need to signal.
Move.
When safe, release
the handbrake and the car will slowly move. Let the clutch up a little
more(thickness of a pound coin) and apply more gas, and as speed builds,
smoothly release the clutch and steer to normal road position(about a
meter from the kerb.)
Check mirrors again.
Stopping.
Choose suitable place and apply M S M routine.
Having
signalled if necessary, steer a little towards the kerb. Move your
right foot from the gas pedal and progressively apply the brake.
Just
before stopping, prees the clutch fully down with your left foot. This
prevents stalling, but must not be preesed too soon as this can affect
steering and braking. Find out about COASTING.
Apply the handbrake, select neutral gear and cancel any signal.
DO NOT STOP.........
- Within 10 meters of a junction.
- Opposite a junction.
- At a bus stop.
- On a bend.
- Approaching the brow of a hill.
- Where it would restrict the road to less than 2 cars width.
- Zigzag lines at pedestrian crossings etc.
- School entrance.
REMEMBER...........
Mirror.....Signal.....Position.....Speed.....Look.
Driving Lessons Gloucester.
Approaching and Turning Corners.
Always use: Mirrors- Signal- Position- Speed- Look (M S P S L)
Turning Left.
Check mirrors( interior and left door mirror.)
Signal.
Position correctly- about a meter from the kerb.
Speed (adjust.) Ease off gas pedal, but use brake in good time to shoe stop light signal. Do not crawl to turning.
Select correct gear, usually 2nd, but 1st on a sharp corner. Use block gear changes and avoid coasting.
Look for cyclists and into the new road for pedestriansilemerging traffic and obstructions.
The point of turn is when the front of your car reaches the corner.
Check mirrors again in the new road.
Turning Right.
You will cross the path
of approaching traffic. To time it safely, imagine that if you could
walk across, you should be able to drive across. If in doubt, then give
way.
Position as near to the centre of the road that is safe, about a tyres width.
Either stop or turn just before the centre of the side road you are turning into(allow time to steer.)
Do not cut the corner!
Look for cyclists, pedestrians, obstructions and emerging traffic.
Focus and take no risks.
General.
Ensure that you reduce speed sufficiently on approach.
Downhill requires more brake pressure.
Uphill may require little or no brake pressure.
Remember- M S P S L
Driving Lessons Gloucester
Emerging At T- Junctions: Zones of Vision: Roundabouts.
Use M S M routine.
Manouevre is Position- Speed- Look.
Mirror- Signal- Position- Speed- Look.
Emerging is what we do at the end of a minor road to turn left or right into a major road.
You may see signs or markings, which are warnings of possible danger ahead. See the Highway Code for Give Way signs and Stop signs etc.
Watch for unmarked junctions.
Emerging Left
Check mirrors.
Signal.
Position correctly about a meter from the kerb.
Speed( adjust and select correct gear.)
Look
for more information. Your view may be restricted by parked cars,
fences or pedestrians. The view that you have into the new road is your zone of vision.
Keep scanning right and left as you get nearer and your zone of vision will widen. When emerging, you must not cause any other vehicle to slow down, or change direction.
Remember the manouevre takes time.
Emerging Right.
You will be crossing traffic
from your right and joining the flow from your left. This requires
sound judgement of speed and distance. Remember, you must not affect
other traffic.
Do not steer too early. Steering depends on the width of the new road and any obstructions.
Your front wheels should be straight at the Stop or Give Way line.
Open Junctions.
This is where you have visibility as you approach.
You
can make a decision on the approach as to whether you are likely to be
able to fit in with the traffic flow, by reducing your speed, selecting
the appropriate gear in good time and joining the flow of traffic on the
main road safely.
Remember-
you should build your speed up to the speed of the traffic on the main
road as soon as possible, as long as you can do it safely, without
breaking the speed limit.
Closed Junctions.
These
are junctions where there are buildings or other obstructions on the
approach, preventing you from getting a full view into the main road,
thus preventing you from making a decision. In such circumstances,
reduce your speed on the approach to a snails pace, and just before the
Give Way line, slip the gear lever into 1st.
If visibility is complete at this stage, a decision can be made to emerge.
Remember- Peep and creep.
Roundabouts
Roundabouts allow traffic from different roads to merge or cross without necessarily stopping.
Traffic flows one way in a clockwise direction.
Priority: You normally give way to the right.
Some roundabouts have traffic lights that determine priority.
Always use M S P S L and use nearside door mirror when leaving.
Going Left.
Approach and stay on the left. Signal left throughout.
Straight On.
Approach on the left, or middle, if marked. No signal yet. Signal left when you pass the first exit.
Going right, or full circle.
Approach
on the right with right signal. Stay on the right of roundabout. Signal
left when you pass the exit before the one you want.
Traffic mixes on roundabouts, so use anticipation.
Beware of: Long vehicles, cyclists and horses( see highway code.)
Plan your approach,get the correct lane early.
Look early.
These basic rules apply on any roundabout, including mini-roundabouts( see highway code.)
Your driving instructor at John Lowe Driving will ensure that you are fully comfortable with all aspects of junctions and roundabouts, using the latest tuition techniques
Driving Lessons Gloucester.
Awareness and anticipation: Adequate Clearance: Making Normal Progress.
Anticipation
means planning well ahead and acting promptly to changes going on
around you. Always ask yourself what other road users are likely to do
and how you can fit in with their actions.
This is defensive driving
and it will usually prevent you being taken by surprise, prevent
hazards arising, and leave you able to take action when necessary.
This requires effective use of mirrors.
Adequate Clearance.
Going
past a parked car: about a meter, allow for a door to open. Slow down
further if the road is narrow and does not allow for a meter.
Stopping behind a stationary car: make sure you can see their rear tyres where they touch the road.( The entire rear tyre.)- "Tyres on the tarmac."
Cyclists.
At least as much clearance as you would give a car. Remember they wobble!
Seperation Distances from the Vehicle in Front.
Learn your stopping distances.(Highway Code.)
In good conditions, about a meter per mile per hour of speed.
Use the two second rule. If the road is wet, allow twice this gap.
Making Progress.
This
means assisting the free flow of traffic by driving at an appropriate
speed, within the limit, without causing frustration, inconvenience or
annoyance to other road users.
This requires good forward planning. Progress must be neither too fast, or too slow for the conditions. Avoid rash decisions.
Hesitation.
Avoid
undue hesitation. If there is a safe opportunity to go, should take it.
Do not necessarily wait for the road to be completely clear.
Driving Lessons Gloucester.
Meeting, Crossing and Overtaking Other Vehicles Safely.
Meeting Approaching Traffic.
This
can cause a danger of conflict with other road users. The most usual
situation is where there is an obstruction such as a parked car in the
road ahead.
Use M S P S L. Anticipate actions of others. Give way where necessary. Do not squeeze through.
Crossing Traffic.
This usually means turning right into a side road or driveway, but the same safety principles apply when emerging to turn right. (See "Emerging at T-Junctions. )
You need less of a gap to cross and it must be timed to a larger gap when joining traffic on the far side of the road. In other words, do not affect vehicles on your left as you emerge.
Use M S P S L.
Position as close to the middle of the road that is safe.
Do not affect other drivers.
Give way to pedestrians.
Judgement-Have I got time? If you could walk across, you should be able to drive across safely.
Overtaking.
First Rule of overtaking. Where can I pull back in safely?
Use P S L M S M.
Give adequate clearance.
Give way if necessary in a meeting situation.
Have regard for large and slow vehicles, give them a clear run.
Flashing headlights: use your own judgement.
Unsafe to overtake: bends, junctions, brow of a hill, cyclists or horses just before you turn left.
Make sure you have enough power. It may be necessary to change down a gear.
Find out when you can overtake on the left.
Remember: Is it safe? Is it legal? Is it within my capabilities?
Driving Lessons Gloucester
7. One Way Streets.
|
|
Traffic must travel in the direction indicated by the signs.
Buses and / or cycles may have a contra-flow lane.
Do not change lanes suddenly.
Unless road signs or markings indicate otherwise, you should use:
- The left hand lane when going left, or left hand side, if unmarked.
- The right hand lane when going right, or right hand side, if unmarked.
- The most appropriate lane when going ahead.
Remember: you can overtake on the left, so expect others to overtake you on the left.
Remember: M S P S L at all times.
Sometimes road signs are turned or
obscured. Look for the way the cars are facing, or the "grey" backs of 2
circular signs.(Circular signs give orders and the only time 2 appear
at the end of a road is "No Entry",thus indicating the end of a one way
street.)
John Lowe Driving.
8. Crossroads, Pedestrian Crossings, Road Markings, Use of Signals.
Crossroads.
A crossroads is a junction where two roads cross, not necessarily at right angles.
There are basically two types: marked and unmarked.
Treat unmarked crossroads with utmost care, as neither road has priority. If unmarked, behave as if you are on a minor road.
Marked crossroads may have Stop or Give Way signs and road markings on the side of your road if you are on the major road, or ahead of you if you are on the minor road.
Traffic lights, or a yellow box junction may control a marked crossroads.
Whether approaching on the major or minor road, you must take effective observation. Look ahead and right, left, right.
Always use M S P S L and act upon road signs and markings.
Use of Signals.
The
purpose of giving a signal is to help others, by warning them of your
intentions. Signals must always be given in good time. Use only signals
shown in the Highway Code. Give signals only when necessary.
Use M S M routine at all times.
Normal signals are: direction indicator and stop light. Check the five arm signals in the Highway Code.
Cancel signals once your action is completed.
Pedestrian Crossings.
There are three main types of pedestrian crossings:
- Zebra Crossings, which are uncontrolled.
- Supervised Crossings, which are controlled by the police, traffic wardens or "lollipop lady."
- Traffic Light controlled, which may be at ordinary traffic lights, or under pedestrian control, such as pelican, puffin or toucan crossings.
Refer to the Highway Code and learn the different types of crossing.
Zigzag lines means that you must not overtake or stop in the zigzag area.
Avoid stopping in the studded area
Do not accelerate towards any crossing.
Look ahead, read the road for warning signs, etc., and always use the M S M routine.
Do not harass pedestrians and never beckon pedestrians across the road.
9.Reversing Into A Side Road On The Left.
If
you are asked to perform this manoeuvre on your driving test, the
examiner will ask you to pull up just before the side road on the left.
He will then explain that he wants you to drive slowly past the end of
the road, position the car and then reverse around the corner, keeping
reasonably close to the kerb.
So, you should carry out these instructions, using the MSM and POM routines at all times.(Your driving instructor will have briefed you fully on these routines already.)
As
you drive slowly past the end of the road, you should be checking what
shape the corner is, square or round, uphill or downhill, any potholes
etc., that might surprise you.
Start the manoeuvre using the POM routine.( Prepare, Observe and Move)
Turn
slightly in your seat, set the gas, ease the clutch to biting point,
check all around, release the handbrake and if its perfectly safe, start
reversing. Use clutch control to keep the vehicle moving very slowly
backwards until you reach the point of turn.
That is the beginning of the corner. Start to steer left at this point,
about 2/3rds of a turn for a round corner, and often to full lock on a
square corner. Remember the front of your car will swing out as you
turn, so full observation is essential. Remember to check all blind
spots before you start to steer and if you are likely to affect any road
user, you should pause until it is safe.
When
you can see into the new road through the rear window, be ready to
straighten the steering. Using a sticker or something similar as a focal
point can be very helpful to line up with the kerb. Your driving instructor will have a reliable method to help you get used to the final position of the car.
Keep on the lookout for other road users, particularly:
- Pedestrians about to cross behind you.
- Vehicles approaching from any direction.
10. Reverse Parking and Reversing into a Parking Bay.
Reverse Parking.
"Pull up alongside the vehicle on ahead and then reverse back and park close to and parallel to the kerb."
This is the instruction you will receive on your driving test if you are required to reverse (parallel) park.
Provided there is a gap of at least one and a half car lengths, you can park between two vehicles using reverse gear. The car is more manouevrable in reverse.
Ask yourself: is it safe, convenient and practical?
Always use:
M S M
P O M
C A O (control, accuracy, observation)
Move alongside and parallel with the parked car, using M S M routine. Keep your footbrake applied and select reverse gear, so that following traffic can see your reversing lights. Have a good look all round, and when safe, reverse slowly back (clutch control) looking through the rear window. When the two back ends are level, apply left lock to bring your vehicle towards the kerb.
Look around, as the front will swing out.
When you see the kerb move about a third across the rear window (focal point), apply right steering lock.
Check that you are clear of the vehicle in front, and when the front of your car slowly docks with the kerb, straighten up the front wheels, steering quickly left. Stop the car and apply handbrake and neutral. Complete the exercise within two car lengths.
Reverse into a Parking Bay (Left).
Always Use:
M S M
P O M
C A O
Pull up just past (about 2 car lengths) the parking bay you have selected, about 2 meters from it. Select reverse gear and look around . When safe, reverse slowly back (clutch control) and when the first white line of your bay appears in your nearside rear side window, (focal point), steer steadily onto left lock. As the car turns into the bay, check to your right. Use rear window observation. Judge when the car is in the bay and straighten up by steering quickly right. Do not reverse out of the bay at the rear.
Stop and apply handbrake and neutral.
Check your position by carefully opening your door to see the bay markings.
Adjust your position if necessary, by slowly moving forwards and then backwards, steering quickly to adjust.
Reverse into a Parking Bay (Right.)
Position about 2 car lengths past the bay, and and about 2 meters from it. Look over your right shoulder and you will see the bay. Reverse slowly into it after full observation, guiding the car by steering right.
When in the bay, straighten up by steering left.
Check position as before.
11. Dual Carriageways.
Driving on dual carriageways
requires somewhat different skills due to the higher speeds involved.
Dual carriageways can be two or three lanes and can involve speeds of up
to 70 mph (national speed limit.) Driving on dual carriageways can help you to prepare for motorway driving.
Some of the main safety requirements involve:
* Effective Observation:
Early and frequent use of mirrors( M S P S L)
Blind spots (joining and leaving the road and overtaking.)
Continual re-assessment of other vehicles, especially those ahead, alongside and behind.
Scanning the near, middle and far distance.
* Judgement and Planning:
Joining from slip roads.
Adjusting speed to fit in with other traffic.
Keeping a safe distance from the vehicle ahead (the two second rule. See Highway Code.)
Overtaking: deciding when safe,
allow enough time, have you the power? Can you get back? Use M S M
routine, move back without cutting in.
Anticipate when the road becomes single carriageway. Look for signs, observe far distance, reduce speed.
*Turning left from and onto dual carriageways:
Use M S M, adjust speed, judge position.
*Turning right from dual carriageways:
Planning in advance.
Getting in the correct lane.
Look for signs, markings and approach lanes.
*Turning right onto dual carriageways:
Using the central reservation.
Assessing the speed of traffic.
Assessing when safe to cross.
Driving test routes from Gloucester Driving Test Centre make frequent use of dual carriageways, with speeds of 70 mph,(national speed limit) so your driving instructor from John Lowe Driving will ensure that you are fully prepared and properly coached in this aspect of driving.
12. Country Lanes.
|
Country lanes differ from town roads mainly as follows:
- The possibility of higher speeds (up to 60 mph, national speed limit.)
- Sharper bends, more hills and greater opportunities to overtake.
Country lanes are also the most dangerous of roads to drive on, especially for younger, inexperienced drivers.
It is important to observe the road ahead, especially the middle and far distance.
Keep a safe
distance from the vehicle in front. Always make progress safely and deal
with bends by adjusting speed and using correct positioning. Find out
from your driving instructor about the "vanishing point," and make it an integral part of your driving skills.
Observe "dead ground" early enough to see vehicles disappearing from view.
Overtake safely, using effective M S M routine and by judging speed and intentions of approaching and overtaken traffic.
Bear in mind that hills affect a vehicles performance and the correct gears should be used (up and downhill.)
Consider pedestrians where there is no pavement.
Look out for horse riders and pass only when safe and in a considerate manner, using the
M S M routine.
Use your horn where appropriate before sharp bends.
Be aware of farm buildings, slow moving vehicles, animals and mud on the road.
13. Emergency Stop.
If you are driving safely and
sensibly, using M S M and anticipating well ahead, an emergency
situation is considerably reduced, especially if you always follow the
rule of being able to stop safely in the distance that you can see to be
clear ahead.
However, emergencies do arise and so you must know how to stop your vehicle promptly and under control.
Act quickly in an emergency, and
as soon as you see the danger, brake firmly. Use the rule of
progressive braking. Leave the clutch pedal alone until just before
stopping. This reduces the chance of skidding. If your car has anti-lock
brakes (A B S), the brakes can make an almighty rumbling noise in
emergency braking. This is normal. Do not release the brake pedal in alarm!
The car will not stop if you do! Keep both hands firmly on the steering
wheel, as the braking force throws extra weight to the front wheels.
After the car has stopped, apply handbrake and neutral.
Skidding.
Should the car skid, ease off
the footbrake and then reapply the brakes with less pressure. If the
back of the car swings, steer the same way as the swing. (See Highway Code.)
After the Stop.
Apply handbrake and neutral. Before moving off again, check all around and over both shoulders, and of course, the mirrors.
14. Independent Driving.
|
At
some point during the driving test you will have to drive independently
for approximately 10 minutes. This will demonstrate to the examiner
that you are able to follow verbal route directions or route direction
signs, whilst still driving safely. The examiner will test you in one of
three ways, these are:
- Road Signs
The
examiner will ask you to follow the direction signs to a specific
destination until further notice e.g. 'I would like you to follow the
signs towards Cheltenham and Cirencester until further notice.'
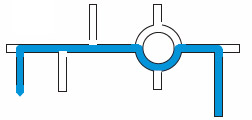
- Verbal directions
The
examiner will give you a number of verbal route directions to follow.
He may also show you a simple diagram of the route, like the one shown
below, to help you follow the directions. E.g. 'At the end of the road
turn left, at the roundabout follow the road ahead, and then take the
second road on the left.'
- Verbal directions and road signs
The
examiner may give you a combination of both direction signs and verbal
directions to follow. E.g 'I would like you take the first road on the
left, take the second road on the right and then follow the signs
towards Painswick.
If you ask for a reminder of the
directions, the examiner will confirm them to you. Driving
independently means making your own decisions and, just like when
driving with friends, this includes deciding when it's safe and
appropriate to ask for confirmation on where you're going.
If you go off the independent
driving route it won't affect the result of your test unless you commit a
driving fault. If you go off the route or take a wrong turn, the
examiner will help you to get back on the route and continue with the
independent driving.
If there are poor or obscured
traffic signs, the examiner will give you directions until you can see
the next traffic sign - you won't need to have a detailed knowledge of
the area. If this happens the examiner would say, 'There are no signs
here. Just continue ahead please' and then, 'Now, carry on following the
signs to ........' |
|
15. Theory and Hazard Perception Test.
The Driving Theory Test
The Theory Test is a computer based multiple choice exam, which is easily operated. No computer skills are required, just a sound knowledge of driving theory.
The
hazard perception part of the test is also computer based and will test
your reactions to developing hazards. You will understand the
requirements more fully when you start your practical lessons, as
hazards are experienced frequently on the road.
There are a number of software programmes available online, to assist with preparation for both tests.
There are test centres in Gloucester and Cheltenham.
What is the Theory Test?
The test is in two parts.
- 50 multiple choice questions.
- 14 hazard video clips, each lasting about a minute. There will be 15 hazards.
You have to succeed in both parts at the same appointment to gain a pass.
Headphones are used throughout the test and both tests are on a touch screen computer.
Your driving instructor will give all assistance as will we at John Lowe Driving.
| 16. Introductory Mock Test. |
|
This will be conducted from the test centre, where possible, by your own driving instructor,
who will create a test atmosphere, using an element of role play. He
will mark the test in the same manner as the D V S A examiner, use the
same verbal expressions, and use a D V S A test route.
At the end of the test, he will
debrief you and point out any weaknesses. These can be worked on in the
future and it is a very effective way of focusing attention where it is
needed. This introductory mock test will usually take place when you are
just "scraping" test standard.
Mock Test.
This
will be conducted as above, but wherever possible using a different
driving instructor, giving a more realistic atmosphere, and a" fresh set
of eyes".
If a reasonable standard is achieved, your driving instructor will then put you forward for your driving test.
Passing a mock test does not guarantee a pass in the official driving test.
| 18. The Driving Test. |
| |
At last the day arrives!
Firstly, well before the date, check that your documents are in order. You will need:
- Your provisional licence (including the paper counterpart until it is discontinued.)
- Any emails or correspondence from the D V S A confirming your driving test.
Your driving instructor
will normally pick you up one hour before the test time, in order to
allow you time to "warm up" and practise some manouevres. Remember, we
are not trying to learn anything in this hour before- that has all been
done- it's just a "loosener." So make sure you are properly prepared.
Your driving instructor will
come with you into the test centre and give you any advice you need. The
examiner will then take you for your driving test, which will be
similar to the mock tests you have done.
During your driving test, read the road and keep out of trouble. Think clearly, because you will know what to do.
If you think you have made a mistake, don't dwell on it, it may be a
minor fault. If your manouevre is not going well, stop and adjust
position (usually requires radical steering) before you touch the kerb, for example. Use full observation before adjusting. There is usually no need to completely restart the manouevre.
Be prepared, have documents
in order,wear comfortable clothes and shoes and ask your driving
instructor anything that will help you.
GOOD LUCK!
For more information on the driving test and how the test is marked, follow the link to tests & info on www.drivinglessonsgloucester.org
|
|
|
|
| |
|
|
|
|
|
|
| |
|
|
No comments:
Post a Comment